
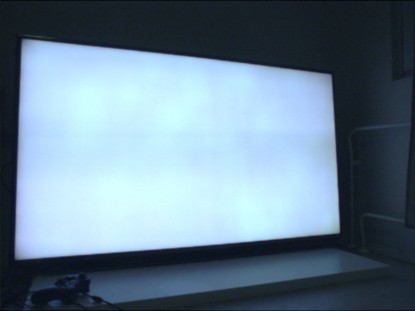
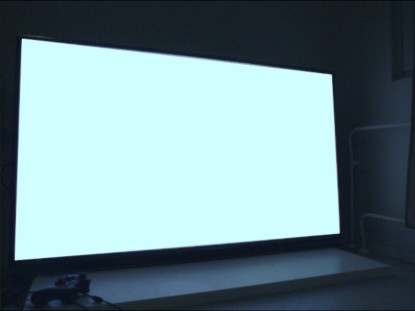
Watching TV makes me see red! I mean it in the literal sense: my Panasonic's backlight is slightly broken causing an uneven pink color when it should be white:
I got this clunker for free so I can't really complain, but a couple of weeks ago I finally decided to do something about the colors. So what is the issue?
The backlight LED array doesn't emit enough blue or green light. This means most screen areas acquire a red tint. This is surprisingly passable in many films, but in black-and-white cinema it's pretty terrible. It's not possible to fix the red tint with regular color correction, since only some of the LEDs are broken. So maybe we could only tweak colors only near the broken LEDs?
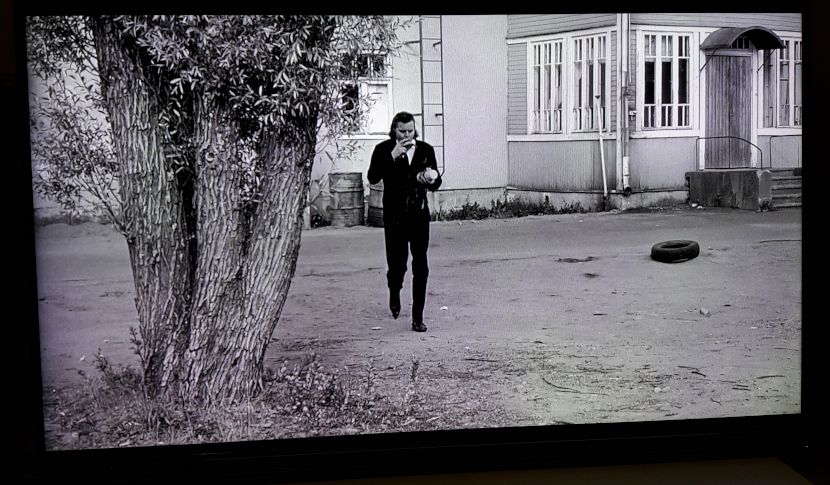
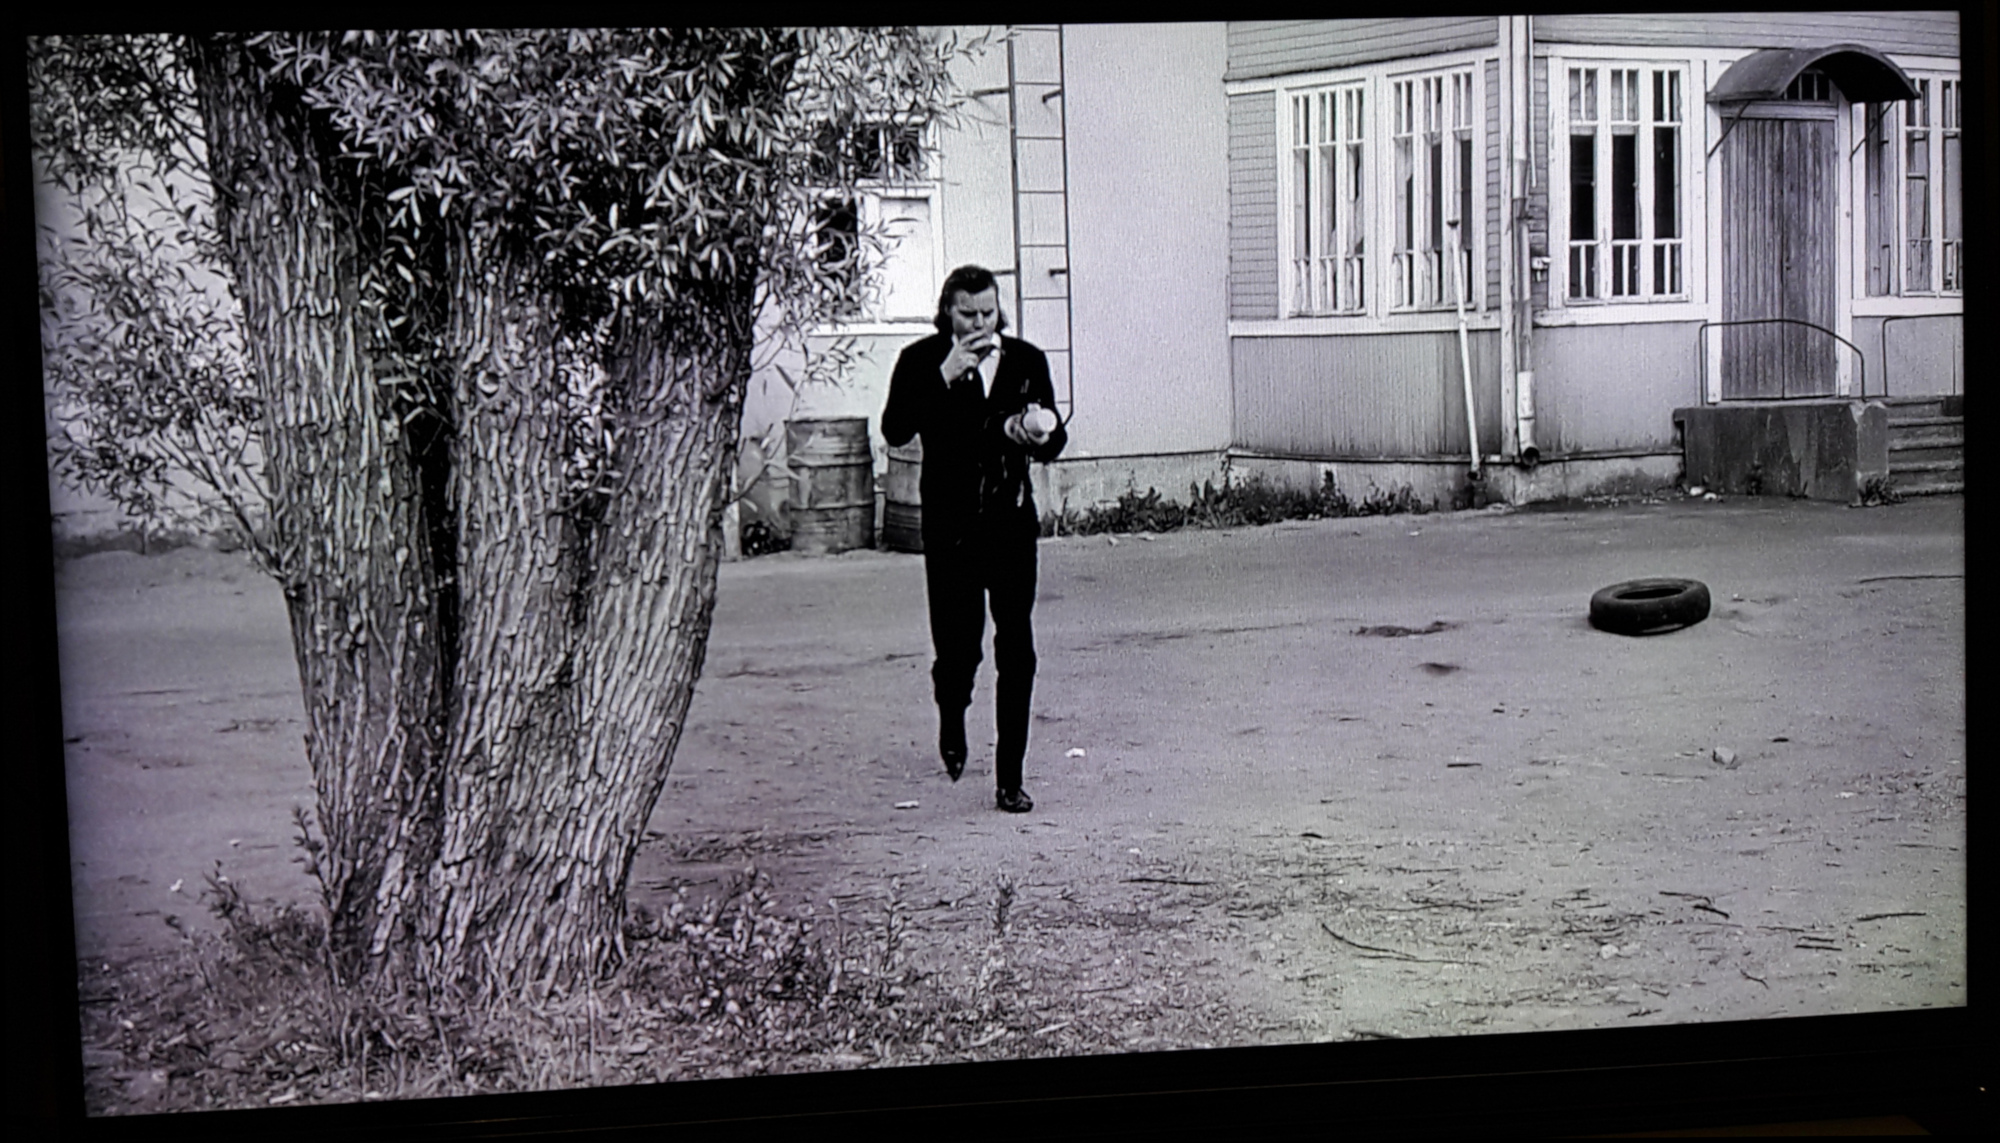
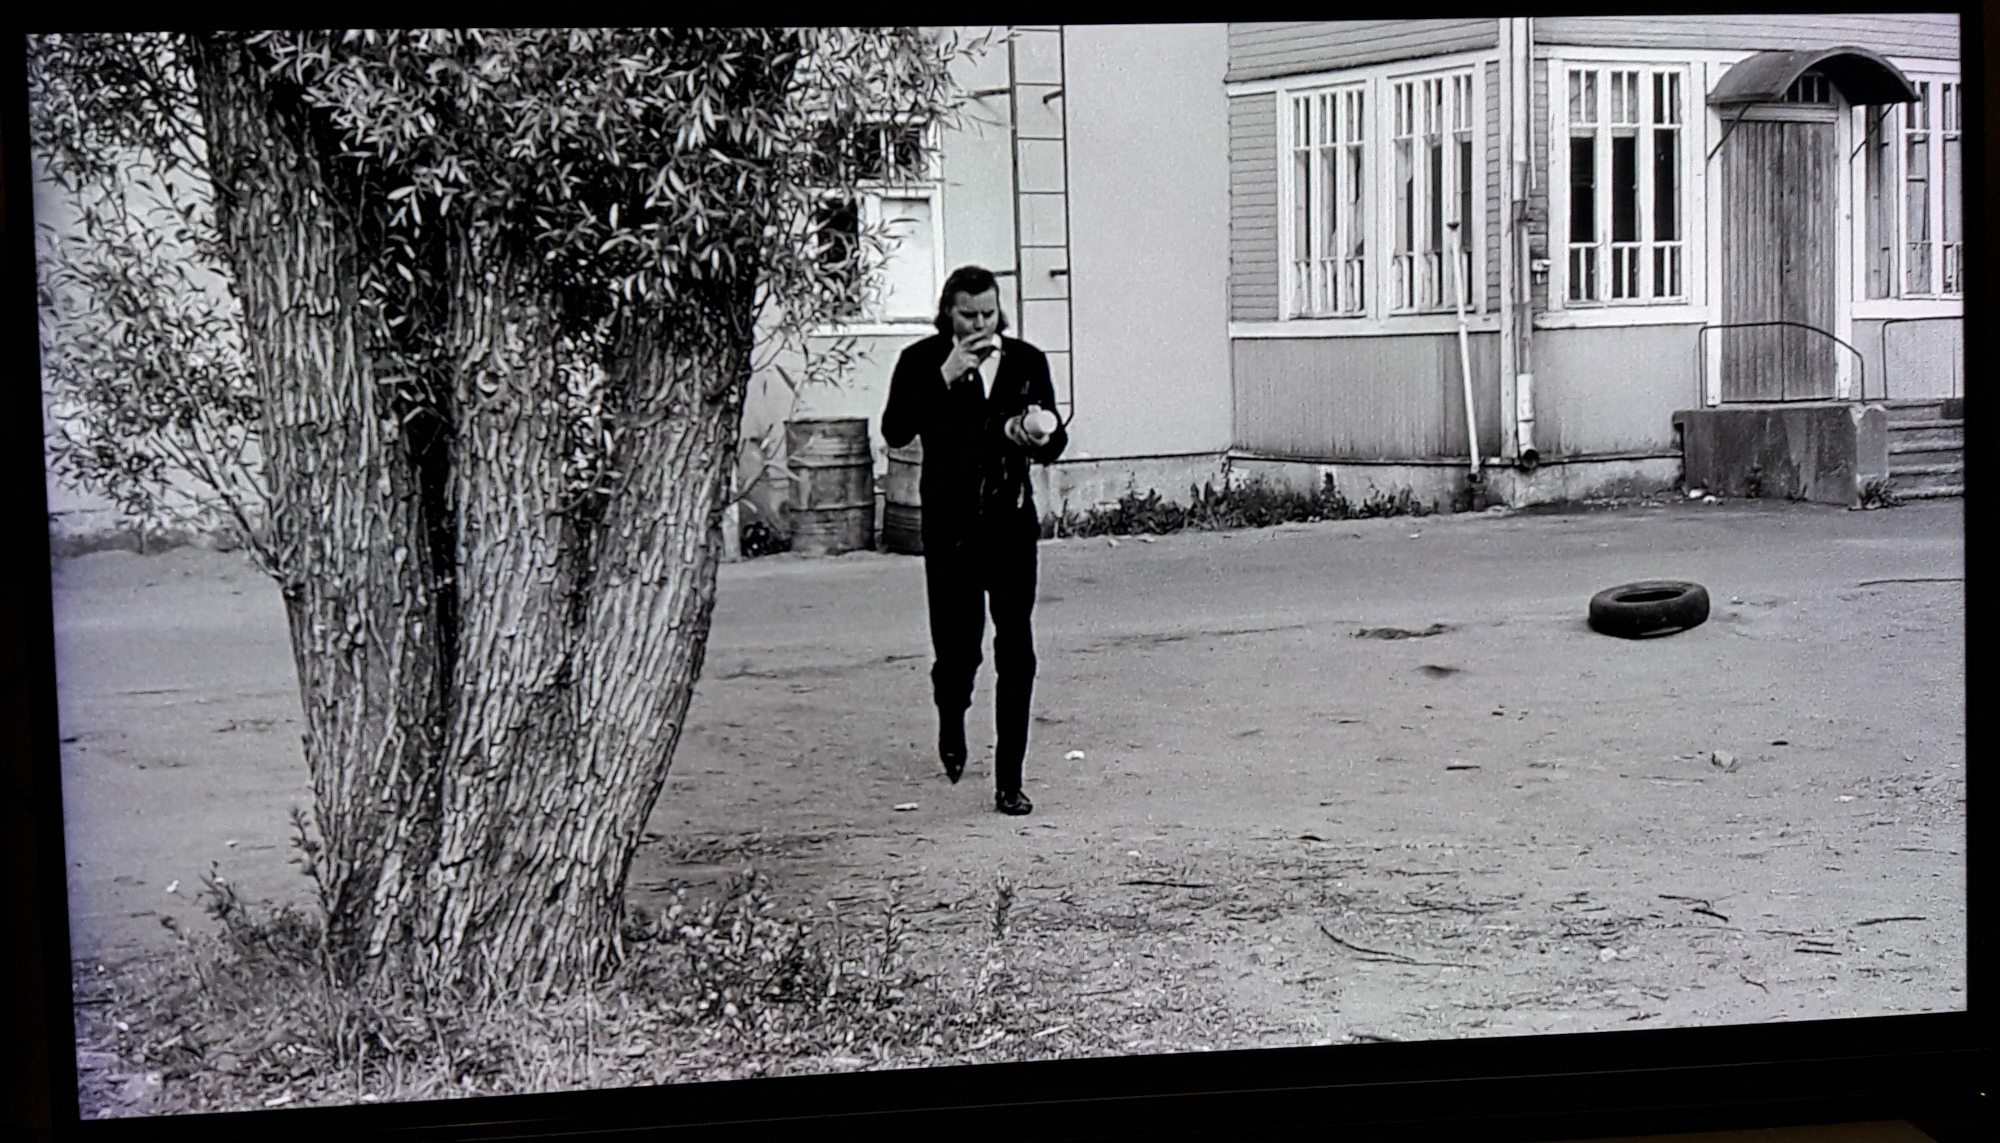
Red blotches become visible when watching "Take Care of Your Scarf, Tatiana".
Let's say we have an image x that the TV distorts into y = f(x). We'd like to find the inverse function f-1(x) that reverses the color distortion so that y = f-1(f(x)). We could then use it to compensate for the red colors before the image is sent over to TV.
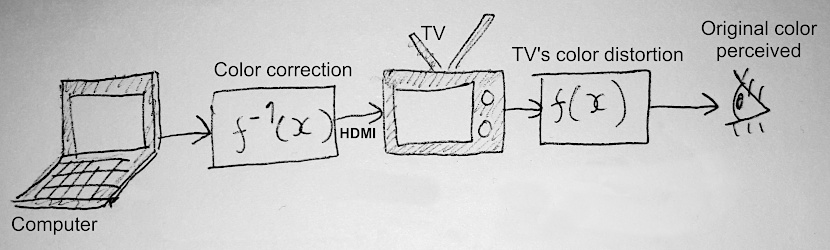
The setup as a diagram. A corrected image f-1(x) leaves the computer via HDMI, gets distorted by TV's f(x), and the final color is seen by the observer.
Unfortunately I happen to know such f-1(x) doesn't exist! As mentioned earlier, the partially operating backlight fails to emit some of the frequencies brightly enough. These can't be brought back with any preprocessing.
You might be thinking "Why can't you just dim green and blue channels instead?" and you'd be right to think that since it's exactly what we are going to do. So the equation we want to satisfy will be
cy = f-1(f(x)),
where c is some constant, say c = 0.9, and y is the real image we want the observer to see. We accept that only 90% of the maximum brightness will be achieved. Now it's time to start looking for f-1. As you saw in the beginning, the red tint varies across the screen, so a constant color correction of the image won't fly. Therefore it makes sense to try to capture the distortion so we can undo it.
I put the TV to show a white screen and took a couple of photos with my phone to get an image of the uneven blob pattern. After some perspective correction and blurring in GIMP it looks like this:
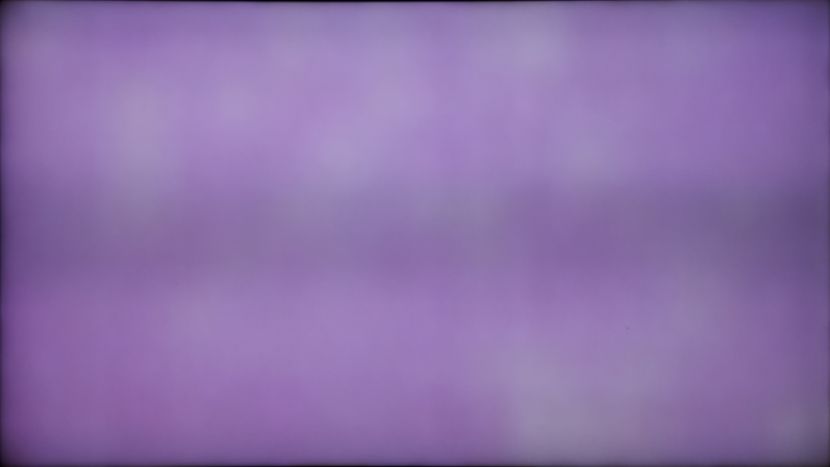
The blob image is an average of three different pictures to break the moire pattern. It also has some Gaussian blur.
Intuitively, we want to reverse the effect of dim backlight pattern. So we should somehow "subtract" this image from the output image before it gets shown on the TV. But what concrete operation does this?
Let the original image be x, and the blob image be z. Let's make the assumption that the function f-1(x), we are looking for is of the form f-1(x) = x * (gain * z + offset), or as code:
z = load_image("blobs.png")

def finv(x):
    return x * (gain * z + offset)
where gain and offset are scalars. What's happening here is that we are first adjusting the colors of the blob image z and then modulating the original input with it. Now the problem boils down to finding good values for gain and offset.
At this point things started to go off the rails. Instead of just trying to find the function by hand, I went for an "optimization" approach. Basically I plugged in a USB camera and pointed it at the TV screen, and wrote a Python script that tried random values for gain and offset until a good image was found. The setup then became this:
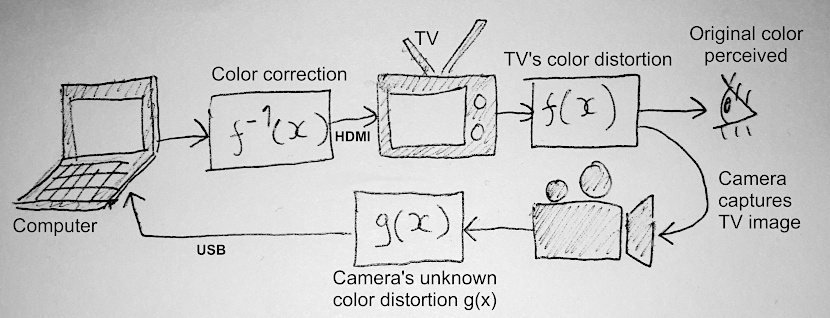
Adding a camera in the loop. The camera sees the colors produced by the TV, distorts them again with its own response g(x), and sends the frame to the computer for analysis.
But how does the computer know what a good picture looks like? What is the fitness function? Can't you just compute a pixel-wise difference with error = |x - camera_img|? The problem with this approach is that the camera has color distortion of its own! That's what g(x) represents in the diagram. This makes formulating a meaningful fitness function more difficult.
After some fruitless attempts at simple image statistics, I realized it's possible to edit a camera picture by hand and use that as a ground truth.
Original camera image (left) and the edited image (right) that became the ground-truth image.
Now it's possible to minimize the mean per-pixel difference between the image above and whatever is coming in from the camera. The loop is basically the following.
import numpy as np

z = load_image('blobs.png')
gt = load_image('ground_truth.png')

# Here we apply the "c" constant mentioned earlier in the article.
gt *= 0.9

# Indices into "params" array
GAIN = 0
OFFSET = 1

params = np.zeros(2)
params[GAIN] = 1.0
params[OFFSET] = 0.0

# Our f^-1 function described earlier
def finv(x):
    return x * (z * params[GAIN] + params[OFFSET])

best_fitness = 0
best_params = np.copy(params)

while True:
    # "frame" is actually taken with a one second exposure to avoid noise
    frame = capture_camera_img()

    # Assume the image intensities are in [0, 1] range.
    # The fitness is one minus the L1 norm of pixel-wise difference.
    fitness = 1 - np.mean(np.abs(frame - gt))

    if fitness > best_fitness:
        best_fitness = fitness
        best_params = np.copy(params)
        print(best_fitness, best_params)

    # Randomize parameters

    params[GAIN] = np.random.random() * -1. - 0.1   # range [-1.1, -0.1]
    params[OFFSET] = np.random.random() * 2         # range [0, 2]

    # Update the picture shown on the TV.
    # We show a corrected blank white image and judge on next frame how good it looked.
    white_img = np.ones_like(frame)
    show_on_tv(finv(white_img))
So which function did emerge as a winner? It's this one:
f-1(x) = x * (-0.9417 * z + 1.48125),
where z is still the same blob image.
Here's how it looks like when applied to a video frame:

Results of the inverse function. Input images (left column) and the corresponding image on the TV (right column). The corrected input image is in the bottom left corner and has a greenish tint. However its result on the right has better balanced colors. Note that here also a global color correction of the final shader is included. Full size.
In hindsight, it's pretty close to f-1(x) = x * (-z + 1.5) which is something one could've guessed without any automated search. In addition, other solutions returned by the search were utter trash. But now is no time for regrets as we have the inverse function and it's time to use it!
The whole point of this exercise was to make black-and-white movies look better. I decided to add a custom shader to the MPC-BE video player. It would be nice to apply the corrective filter to the whole screen instead of just a video playing in an application, but I couldn't think of a way to do it. One cool thing about MPC-BE is that it has a live shader editor:
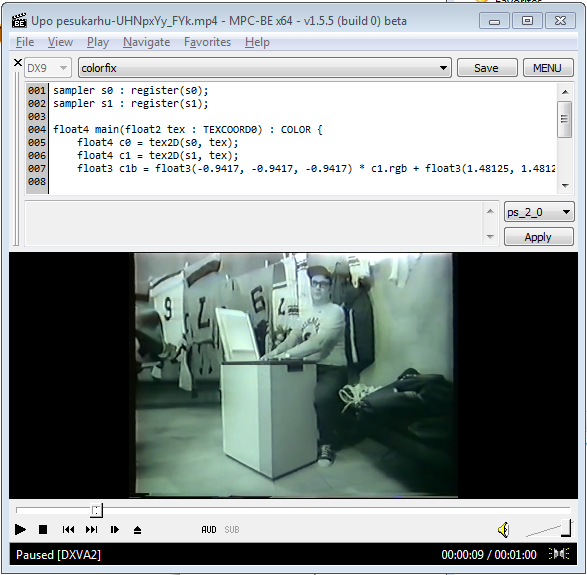
The MPC-BE live shader editor.
The main problem here was that I had to pass in blobs.png image to the shader. It took a while but in the end I managed to hack in support for an external texture, and adjust the brightness and colors a bit. The end result is glorious:
Color correction with f-1(x) helps a lot.
It works! There's still a nasty vignetting effect going on near the edges. However the most annoying high frequency variation is gone. You can also view the full before and after shots.
This particular TV has already been repaired twice, so it was nice to extend it's lifetime even further with a small hack. I haven't yet watched a whole movie with the new colors and it may turn out that small tweaks are still needed.
One aspect I didn't touch in this post is camera calibration. It took some thinking to find a simplest way to do it (no projection matrices involved) and it might be a topic for a future post.
colorfix.hlslAssumes sampler s0 has the input video and s1 has the blob image.
// $MinimumShaderProfile: ps_2_0
sampler s0 : register(s0);
sampler s1 : register(s1);

float4 main(float2 tex : TEXCOORD0) : COLOR {
    float4 c0 = tex2D(s0, tex);
    float4 c1 = tex2D(s1, tex);
    float3 c1b = float3(-0.9417, -0.9417, -0.9417) * c1.rgb + float3(1.48125, 1.48125, 1.48125);

    float4 c2 = c0 * float4(c1b.rgb, 1.);
    c2 *= float4(1.05, 1., 1.15, 1.);
    c2 *= 0.95;

    return c2 ;
}Index: src/filters/renderer/VideoRenderers/SyncRenderer.cpp
===================================================================
--- src/filters/renderer/VideoRenderers/SyncRenderer.cpp (revision 5052)
+++ src/filters/renderer/VideoRenderers/SyncRenderer.cpp (working copy)
@@ -45,6 +45,16 @@
#include "../DSUtil/DXVAState.h"
#include "../../../apps/mplayerc/resource.h"
+#define NOMINMAX
+#include <algorithm>
+namespace Gdiplus
+{
+ using std::min;
+ using std::max;
+}
+#include "../../../apps/mplayerc/PngImage.h"
+
+
using namespace GothSync;
using namespace D3D9Helper;
@@ -654,6 +664,45 @@
}
hr = m_pD3DDevEx->ColorFill(m_pVideoSurfaces[m_iCurSurface], nullptr, 0);
+
+
+ CMPCPngImage pattern;
+ DLog(L"Loading pattern texture");
+ // TODO use relative path
+ if (pattern.Load(L"C:\\dev\\opensource\\mpcbe-code\\pattern2.png") == E_FAIL) {
+ DLog(L"Loading failed");
+ }
+ else {
+ DLog(L"Pattern: %dx%d @ %d bpp, IsDIB: %d", pattern.GetWidth(), pattern.GetHeight(), pattern.GetBPP(), pattern.IsDIBSection());
+ if (FAILED(hr = m_pD3DDevEx->CreateTexture(
+ pattern.GetWidth(), pattern.GetHeight(), 1, D3DUSAGE_DYNAMIC, D3DFMT_A8R8G8B8, D3DPOOL_DEFAULT, &m_pPatternTexture, nullptr))) {
+
+ DLog(L"Texture creation failed");
+ return hr;
+ }
+ else {
+ DLog(L"Pattern texture OK");
+ unsigned char* data = (unsigned char*)pattern.GetBits();
+ int pitch = pattern.GetPitch();
+ DLog("Data: %p, pitch: %d bytes\n", data, pitch);
+
+ D3DLOCKED_RECT rect = {};
+ m_pPatternTexture->LockRect(0, &rect, NULL, D3DLOCK_DISCARD);
+ DLog("Rect pBits: %p, rect.pitch: %d bytes\n", rect.pBits, rect.Pitch);
+ for (int y = 0; y < pattern.GetHeight(); y++) {
+ for (int x = 0; x < pattern.GetWidth(); x++) {
+ unsigned char* pix = (unsigned char*)rect.pBits + (y * rect.Pitch + 4 * x);
+ pix[0] = data[y * pitch + 4 * x + 0];
+ pix[1] = data[y * pitch + 4 * x + 1];
+ pix[2] = data[y * pitch + 4 * x + 2];
+ pix[3] = data[y * pitch + 4 * x + 3];
+ }
+ }
+
+ m_pPatternTexture->UnlockRect(0);
+ }
+ }
+
return S_OK;
}
@@ -669,6 +718,7 @@
m_pRotateTexture = nullptr;
m_pRotateSurface = nullptr;
m_pResizeTexture = nullptr;
+ m_pPatternTexture = nullptr;
}
// ISubPicAllocatorPresenter3
@@ -1483,6 +1533,8 @@
Shader.Compile(m_pPSC);
}
hr = m_pD3DDevEx->SetPixelShader(Shader.m_pPixelShader);
+
+ hr = m_pD3DDevEx->SetTexture(1, m_pPatternTexture);
TextureCopy(m_pScreenSizeTextures[src]);
std::swap(src, dst);
Index: src/filters/renderer/VideoRenderers/SyncRenderer.h
===================================================================
--- src/filters/renderer/VideoRenderers/SyncRenderer.h (revision 5052)
+++ src/filters/renderer/VideoRenderers/SyncRenderer.h (working copy)
@@ -153,6 +153,7 @@
CComPtr<IDirect3DSurface9> m_pOSDSurface;
CComPtr<IDirect3DTexture9> m_pScreenSizeTextures[2];
CComPtr<IDirect3DTexture9> m_pResizeTexture;
+ CComPtr<IDirect3DTexture9> m_pPatternTexture;
CComPtr<ID3DXLine> m_pLine;
CComPtr<ID3DXFont> m_pFont;
CComPtr<ID3DXSprite> m_pSprite;